Friday, September 30, 2011

Renovation, Part 8

Last time we saw our new concrete whose release agent had been hosed off. It's a nice color but a bit dull. It needed one more technique applied to it. It got a sealant that makes it glossy and richer.

Before being washed and sealed:
After:
And what it looks like today with the stucco repaired, the paint touched up and the sun shining:

Next project: The fence!

As I've pointed out before, the oleanders are dying of oleander leaf scorch. There's a hedge of oleanders running between the neighbors' driveway and and our chain-link fence. When those oleanders are dead there is going to be nothing to block the world's view of our side yard. It's got our trash bins, a tool shed, gas and electric meters and other assorted stuff. We don't want those things to be what people see when they approach our house. Besides, we now have a vast area where we might want to have a nice, private, candle-lit dinner in the great outdoors.

So we had a fence put up as part of this project. You've seen the beginnings of it earlier. The day after they sealed the concrete they came back and put up most of the fence.

The huge gate came later and Jerry sealed the wood.

Matt, the foreman, gave us a cable to pull on to open the gate's latch.

We have a secluded place to relax and watch the hummingbirds.

The gate is wide enough to let their tractor back in if we need to have more work done!

The caps to the septic tank's two-way cleanout got stained to blend in with the walk.

Weeks and weeks after all this work was done Matt finally came back and installed some grates over the vents that let the house breathe. They're below the walk and we didn't want to have to keep cleaning leaves and other junk out of them.

We moved our compost bins out of the way before all this started. We got a new composter from Costco and put it on some of the pavers that were taken out of the front yard at the beginning of the project.
It seems to be doing a much better job composting our yard and kitchen waste than our old ones. I didn't get around to turning them. This one makes turning the pile so much easier!

We are still seeing a lot of bare dirt around this new walk. We have another project ahead of us.

Tuesday, September 27, 2011

Turtle Tchotchke Tuesday

Some mystery turtle hooks.
These came in the mail a few days ago. No note.
We haven't decided where they're going to be hung.

Monday, September 26, 2011

Renovation, Part 7

The day after they poured the concrete we got to look at things more closely.

We got to see the side of the house for the first time.
You'll notice (you probably already noticed last time) that the surface of the concrete isn't your normal, broom finish. We wanted a finish that is more attractive. So we had them stamp a stone finish onto our walks.

We also wanted something prettier than your basic concrete color. They gave us a card with samples of all the colors available. The card listed three grades of colors. The foreman told us that all the colors were the same price. That didn't seem right but we chose a bold red from the highest grade of colors. It turned out that we were right in thinking that it would be more expensive. The owner of the company convinced us that the color probably would be a bit too bold and we didn't want to have the added expense. So we went for a less bold (and less expensive) color.

The stamping process uses a "release agent" that adds more color and depth to the surface. It lets the stamps be removed from the concrete without lifting any of the concrete with it. As I recall, we didn't choose the release agent's color until just before they poured. I had no idea what was involved and I couldn't visualize how this new choice was going to affect the final product. I let Jerry figure this one out.

This batch of pictures show the fresh concrete with the release agent not yet washed off.

In addition to the stamps for the stonelike surface, they have other decorative stamps. Like turtles! (The page with the turtle stamps is currently showing only the stamps and not the end result. But you don't need that missing picture.)

Let's look at a turtle. Here's a close-up of one of the turtles stamped in this project.
This one is at the beginning of the walk from the garage to the front door. The release agent hasn't been washed off so it looks kind of chalky. You can see another of the turtles in this picture from the last edition (just below the cuidado tape).

The next day they washed the release agent off the walks.
That didn't improve the appearance a lot.

Here's a view of the above turtle after it got its bath.

Remember our two-way cleanout? Here it is (well, its caps) after it got washed.

There's still an oleander down there at the end of the walk. What is its fate?

Friday, September 23, 2011

Renovation, Part 6!

When we last checked in, the framing had been completed. That was a Saturday. They didn't do any work on Sunday. Or Monday (it was a holiday). Or Tuesday.

By 6:00 Wednesday morning a swarm of people had descended on our yard.

A few things needed to be done before the concrete was to start flowing in just a couple of hours.

Before this project was started we had been sending the water from our washing machine out to the yard rather than into the septic tank. We had the washer drain into a trash barrel that held a sump pump that had a garden hose connected to it. When the washer drained into the trash barrel the pump would turn on and send the water gushing through the hose, under the garage door and out to the yard.

That solution wasn't going to work with our nice, new walkway. We didn't want an ugly hose crossing our new walks. Besides, we eventually want to get the yard nicely landscaped and the ugly hose would look even uglier.

We added a little feature to our project where they would run a pipe under the concrete to the dirt by the driveway. Then they'd run a pipe from the laundry through the wall and connect it to this drain pipe.

In the last edition we saw this picture:
There's a skinny white pipe on the ground running along the garage. I was in a panic. There was no way that that little pipe would be able to keep up with the washer when it is draining. The little pipe was still there on concrete day and we hadn't seen anybody between the time the pipe was set up and concrete day. Yikes, yikes, yikes!

Fortunately, the owner of the company knew the wrong pipe was set up and brought the correct pipes and  everything would be just fine.

The only problem was that the pipe is pretty wide and would need be be set into a trench so it didn't live up in the new concrete. They just couldn't dig the trench through the concrete that held the old gate post (seen here beneath the scarred wall where the post was up against the house):
They had to fire up their jackhammer at 6:00 AM to carve the trench through the old post's anchor. The neighbors must have loved us.

We went off to work while they were doing their final preparations.

We came home to an all-new yard!
There's a pipe sticking out from under the new walk that will be able to carry the water from the washer!

We have a grand walk leading you from the driveway...
...to the front door (and from the front of the garage across the front of the house)!

And at the back of the house!
It's fresh and we can't walk on it yet. This picture was taken from the neighbors' driveway that runs along our fence. We can't see what the other side of the house looks like.

We've achieved concrete!

Wednesday, September 21, 2011

Renovation, Part 5

In Part 4 we saw a ditch being dug under the new walkway near the septic tank. Well, here's the pipe in its full glory:
We occasionally have problems with the drain and we have to get a plumber to visit to clear a clog. Whoever built this house didn't think to have any cleanouts on the line. The plumbers would have to remove a toilet to get to the pipe to shove their auger down. One plumber suggested that we could have a two-way cleanout installed for about the cost of two visits that involve toilet removal. We had concrete over the pipe so that would have been hard to install.

Well, all that concrete was removed so we added this little improvement to our project. A plumber came and installed the cleanout.
With any luck we won't have to use it. But it's nice to know we have the ability to clean the lines without the cost of dismantling a toilet.

Things were buried

Rebar was added to the walk-in-progress


And four days after all this rebar was installed they came and finished framing the front steps

What will the next day bring?

Tuesday, September 20, 2011

Turtle Tchotchke Tuesday

A beach towel. I have no idea where it came from.

Sunday, September 18, 2011

Renovation, Part 4

The old concrete has mostly been removed. There are bits that have to be done with a bit more deftness than can be accomplished with their front loader. Around the pipe leading into the house, for example. But it has been cleared away enough to start framing the new walks.

Going clockwise around the house here's the side of the garage. There is no art on the wall.

The front of the house:
There's still a chunk of old concrete by the front door that has to be carefully chipped out.

The gate going to the side of the house:

Along the side of the house:

Rounding the corner to the back of the house:

Around the garden room:

The other side of the garden room. Here's one of the septic tank's lids.

By the pile of dirt in the picture above there is an exploratory trench being dug.
They're searching for the pipe going out to the septic tank. You can see it at the bottom of the picture! More about this later.

Here's the end of the house with the family room and the garage:
We're going to have the concrete fill the space between the house and the fence. What are those posts along the fence?

Here's the view from the end of the driveway. We're going to have a grand walkway leading up to the front door.

If you look at this picture of about the same view taken a few days before these pictures you might notice something's gone. We've opened up the yard a lot.

What a difference a few days make!

Wednesday, September 14, 2011

Renovation, Part 3

Here comes the second day of demolition!

Last time we were going around the house in a counterclockwise direction. We had made it to the garden room. Continuing around the house that evening we saw this:

The next day we came home to this:

You might remember the view of the front of the house from the previous episode. This is what it looked like the next day:
No more walkway along the house. No porch. No more camellia.

Here's another view of this part of the yard:
(I was wrong when I said that we removed the artwork the evening before.) The lavender and big concrete planter with the Mexican grass tree are gone (you can see them in this picture). The mighty forklift moved the Mexican grass tree to another part of the yard:
Also seen in this picture is where they scraped out the dirt in preparation for an all-new walk. This part of the yard had a bunch of naked ladies. The bulbs were going dormant so I dug them up and put them in a bucket and a trash can. They're still there. It's time for them to be blooming. Some of them are blooming:
I need to be getting them back into the ground!

We got to take this opportunity to get rid of junk that had been accumulating around the yard. A junk heap was started:
Not seen in this picture are a couple of clothesline poles that we moved from the side of the house many years ago to the spot seen here. We had used them to hold up netting for peas to grow on but with little success. The poles got moved to the junk heap in the front yard:

That's Day 2 of the demolition. Maybe this is the evening we took down the artwork. Things are moving right along.

Tuesday, September 13, 2011

Turtle Tchotchke Tuesday

A beaded coin purse.

Sunday, September 11, 2011

Renovation, Part 2

A few years ago, we hired a landscape designer to come up with a plan for what we can do with our yard. She came over and got ideas from us about what we wanted. She measured the property and went off. When her initial plans were done we had a meeting to go over some drawings she had made.

I told her that the septic tank is where we pointed it out at the first meeting and it couldn't be covered by anything permanent. We gave her other feedback about her design (like pointing out that plants she suggested would freeze here). She went off and did some tweaking.

At our next meeting I pointed out that we still have a septic tank where she had written "Septic Tank" on the previous plans and in her initial notes and that we really can't have anything permanent over it. And it really does get cold enough here to kill tender plants.

We scheduled another meeting with her. After she was supposed to be here she sent a text message saying something had come up and she'd have to reschedule. We rescheduled for a few days before Thanksgiving. Some time after that meeting was supposed to start she sent a text message saying that Thanksgiving was coming up and that she'd rather meet some other time.

A half hour after that other time came we got a text message saying she had been in a fender bender and couldn't make it. A next meeting could never get scheduled.

After several attempts to have this final meeting Jerry suggested that since she wasn't meeting her side of the contract that maybe we could call it off and she could return the money we had already invested. She said the plans were ready and she would get them to us.

She had somebody dump them on our front porch and left a cheesy turtle with them. The sets of plans weren't even identical. My name was misspelled on one of them. She told us that she had paid her company the rest of the money that was due and that we could send a check to her or somebody other than who the contract was with. Okay...

If anybody in the area is considering somebody for landscape design, check with us to see if you've happened to stumble across this flake.

One of the things that Jerry wanted in this landscape design was concrete to go all the way around the house. We had walks along the front and back of the house (except around the garden room). It was dirt along the sides of the house and asphalt along the garage.

The people who finished our oleander removal project also install concrete.

We engaged them to put in our concrete around the house.

They worked very fast. Initially.

I was going to take "before" pictures of the house. Jerry had said that he took some before pictures so I dilly-dallied. It turned out that his pictures were just of the oleander project. Demolition started before I got to recording what we used to have. I'm having a hard time finding good pictures that illustrate some of what used to surround the house.

This picture from Part 1 shows the view along the side of the driveway and garage after the oleanders were removed. You can see there is asphalt up to the gate at the end of the garage.


Here you see that the asphalt has been removed. And the gate is gone. And the ground to the back of the house has been graded. A pile of stuff that will be pressed into the ground where the concrete is going has been delivered.

Here's a view along the house from where the gate was (well, part of it is still there).
That's a pallet of pavers on their forklift's forks in the distance.

Here's a picture of the front door.
You can see tread marks from their tractor. If you look carefully, you can see that there is no concrete to the left of the steps up to the door. There was some there but it's been hauled off.

The pavers you saw two pictures up were along the side of the garage. Now you see them (from the living room):
Now you don't:
Later that day we took the artwork off the wall so it wouldn't get damaged.

And at the back of the house we used to have a walk and a planter box. I didn't get a recent "before" picture. Here is one I took during an El Niño event (in 1992?):
You can see the walkway in the foreground and along the garden room. The planter has some Lilies of the Nile in it. The red blocks of concrete supported an old shade structure that was falling apart when we moved in in 1988. They were still there before this demolition.

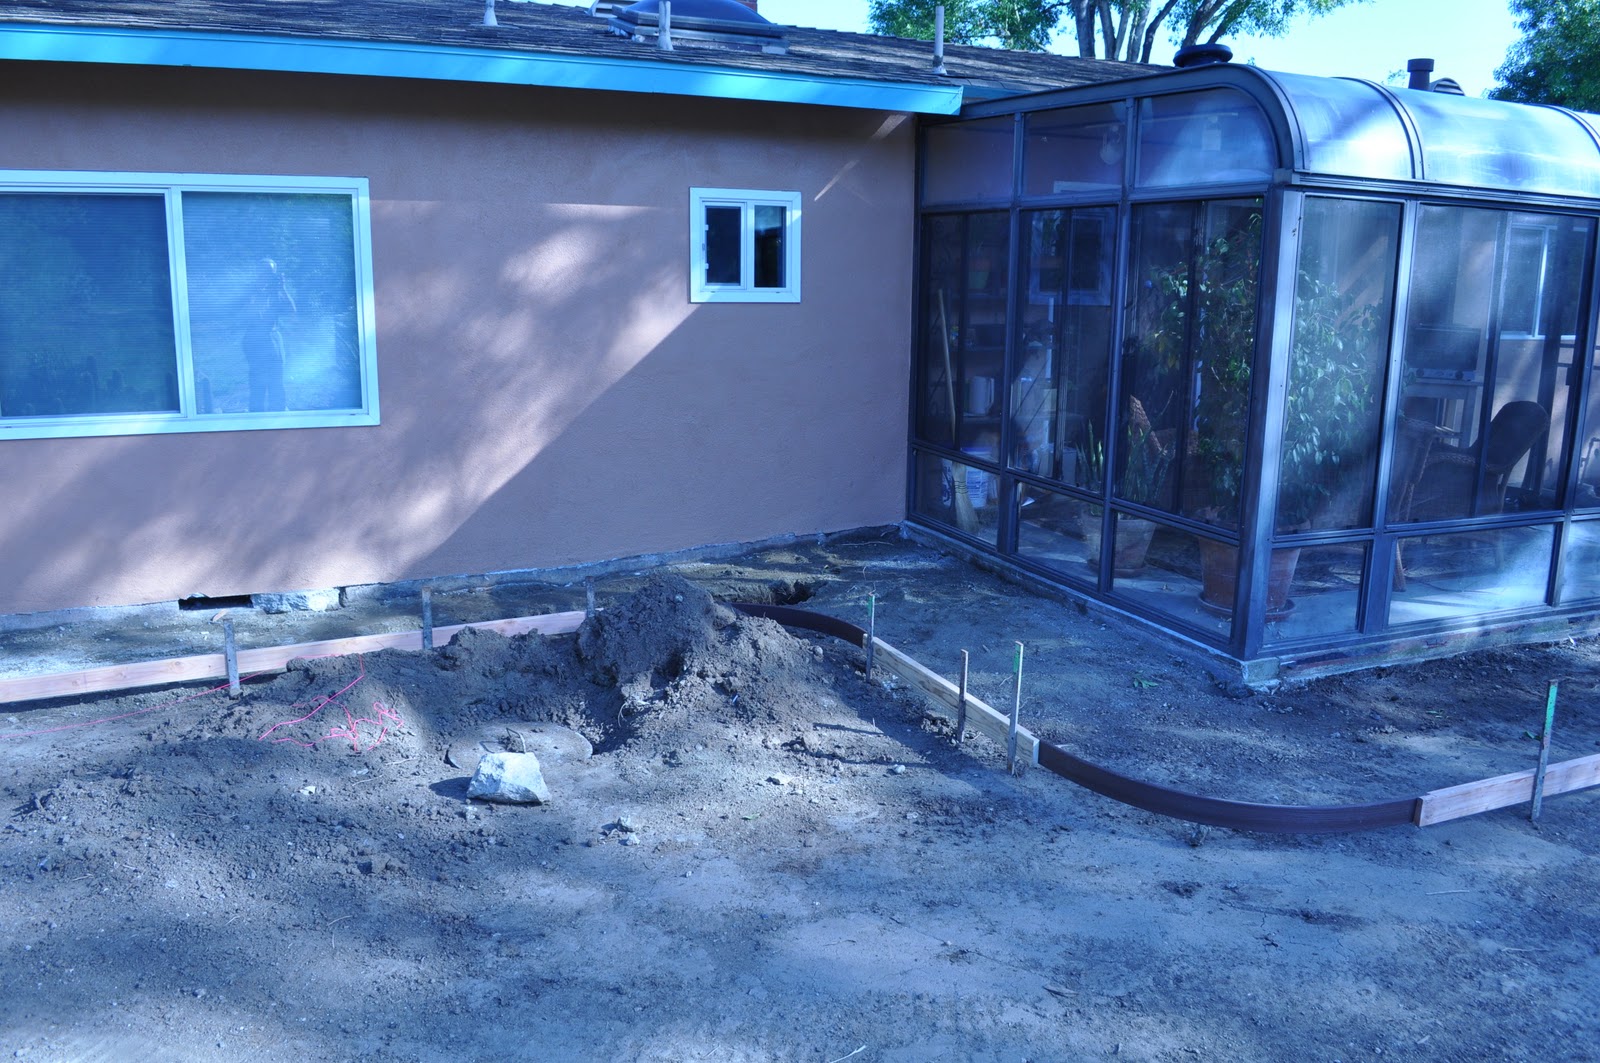
This is what it looked like after they removed the walk, planter and footings of that old shade structure:
No more walk. No big, ugly blocks of concrete. And the ground has been flattened. Soil that was taken out of the yard to make room for the new concrete was moved to the front yard where gophers had made a low region that flooded after rains. No more Lake Bear Valley! (At least it will be just a finger lake.)  The hole at ground level is where a door was before we did our first remodel.

That's Day 1 of the demolition. That's enough for today.